I get asked about sourdough starters a lot and am happy to give some of my starter away to any aspiring baker. Often these people look really anxious when they take their baby starter away from my kitchen. They know this is a big step in their Bread Life and for many, a challenging one.
Not everyone is as obsessed with sourdough bread as I am. But I’m always willing to share my passion and grow more sourdough bakers. 
Last week it was my friend Alana from Food Bloggers Canada. She asked for a starter recipe in a simple text and had no idea I would send back a two-page email. But she’s going to give it a go and I hope you, dear reader, might try making your own starter, from ground zero, following these instructions.
Why have a starter? Well, without one you simply can’t make sourdough bread and taste all of its deliciousness made with your own two hands. Like any living ingredient, if you starve or neglect it, it will die. It needs your nurturing to start your bread.
Why do you want to eat sourdough? Bread made slowly over the course of a few days has rich, layered flavours, tastes completely better than industrial, high-yeast, high-gluten bread and is often easier to digest.
If you follow my Instagram feed, you may want to bake sourdough because it’s such a looker with its scored golden crust and large open crumb. But practice makes perfect. I still get excited each and every time I open up my oven and see a well-risen loaf. I still make mistakes, too. I love the mystery of bread-baking and its complexity. Good baked bread depends on many variables: timing, flour quality, temperature and the ripeness of your starter—to name a few. The only way to get to know these principles is to dive in and flour up your hands.
Jeffrey Hamelman’s Bread: A Baker’s Book of Techniques and Recipes is my bible. Here’s his five-day “liquid levain culture” – bakers’ speak for sourdough starter. I recommend that you go the extra mile and stretch this out to an eight-day process for best results. Once you have this basic culture or starter, you can keep it alive for many years… but not decades!
When I attended the San Francisco Baking Institute in 2015, master baker Didier Rosada laughed in disdain when I bragged about the number of years I’d kept my starter alive. After attending the course, I made a new starter to replace my teenaged one and did not regret the flavour-filled results. Now, three years later, it is time for me to start afresh again.
Before you make your initial starter mix, consider what time works best to refresh (a.k.a. feed) both morning and night. I like the 7pm/7am time frame.
Day One: Initial Mix
4.8 oz organic whole rye flour
6 oz spring or distilled water
.2 oz honey
Mix the ingredients well in a glass bowl and cover with plastic. Let stand in a warm area (75F to 80F) for 24 hrs. (This will look stiff and hard with very tiny bubbles on the underside after the first 12 hrs.)
Day Two: Two Feedings
5.5 oz Initial mix (use half of Day One and throw out the remainder)
1.2 oz organic whole rye flour
1.2 oz organic, unbleached hard white flour
3 oz 90F spring or distilled water
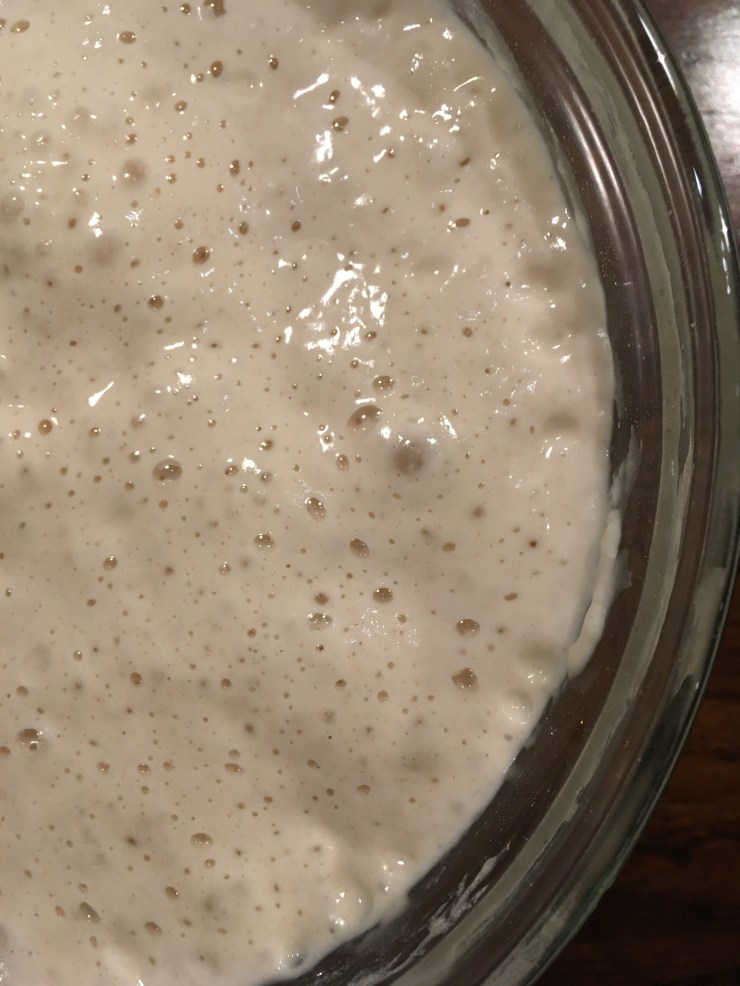
Mix the ingredients well in a glass bowl and cover with plastic. Let stand in a warm area (75F to 80F) for 12 hrs. Repeat (or refresh, in bakers’ speak) in 12 hrs. Yes, you will have to throw out half of each mixture when you refresh. (After each feeding, you will watch it transform and grow, doubling, even tripling in size and smelling very sour.)
Day Three, Four, Five, Six and Seven : Two Feedings per day, every 12 hrs
5.5 oz Initial mix (half of your last batch, throwing out the remainder)
2.4 oz organic, unbleached hard white flour
3 oz spring or distilled water
Mix the ingredients well in a glass bowl and cover with plastic. Let stand in a warm area (75F to 80F) for 12 hrs. Repeat (or refresh, in bakers’ speak) in 12 hrs. This white starter will bubble up and grow faster every day and night and should be ready to bake with by Day Seven.
Okay, now you’ve got your starter, but how are you going to keep it alive? You’ve got to feed it, once a week. Here’s how:
3.5 oz initial mix/mature starter
3.5 oz organic, unbleached hard white flour
3.5 oz spring or distilled water
Mix the ingredients well in a glass bowl and cover with plastic. Let stand in a warm area (75F to 80F) for 12 hrs. Refrigerate and refresh once a week.
How do serious bakers keep their sourdough starter alive? They bake every day. After they build a bread’s initial levain, they remove about an ounce and use that to start the next dough. All you need is an ounce or two to kick-start a bread! The most powerful, active and flavourful starters are those that are refreshed or used every day or two.
Before you get started, make sure you have a scale because serious bakers weigh all their ingredients. I like to use this Zyliss version found at Canadian Tire for $20 or less. You need a scale that can “tare”. That means you can put an empty bowl on the scale, reset to “O” (or tare) then weigh your rye flour, tare again to 0 then pour in and weigh the right amount of water. Tare away!
Local Sourdough
Whether you call it Herd Rd Sourdough, Toronto Sourdough or Katmandu Sourdough, its flavours and ingredients will entirely depend on where you bake it. (Adapted from page 153 of Bread: A baker’s book of technique and recipe)
Levain Build
4.8 oz organic, unbleached, hard white flour
6 oz spring or distilled water
1.3 oz ripe, mature starter (refreshed in the past 24 hrs)
Combine in a medium glass bowl 12-16 hrs before you make the final dough. Make sure the bowl is large enough for the levain to triple in size as it grows and bubbles up. Keep covered at room temperature. (I like to make this late at night, right before I fall asleep.)
Final Dough
1 lb 8 oz organic, unbleached, hard white flour
3.2 oz organic whole rye flour
14.8 oz spring or distilled water
Levain Build (minus 1.3 ounce to be reserved in fridge for tomorrow or the next day’s bread)
Step one: Autolyse
Add all the final dough ingredients to the mixing bowl and mix on first speed until it forms a shaggy mass. Cover with plastic and let stand 20-60 min.
Step two
Add .6 ounce/1 tbsp sea salt to the autolyzed dough and mix 1-2 minutes with a dough hook
Step three: Bulk Fermentation at room temperature
Transfer the dough to a large oiled bowl or oiled tub and cover for 1 hr 15 min
Stretch and fold the dough four times, lifting the dough to its longest extension, folding and pressing it back down, repeat three times, turning the container by a quarter each time.
Cover and leave at room temp for 1 hr 15 min
Step four: Shape two loaves, place in well-floured bannetons and cover with shower caps. Refrigerate 12-24 hrs. Gently flip each loaf on to a parchment paper-covered tray, score and slide into preheated Lodge Combo Cooker pans or Dutch ovens. Bake covered at 500 F for 20 min, carefully remove lids, reduce heat to 460 F and bake 20 minutes or until golden brown.


Gulp!!
I’m in! Looks like an adventure, plus I love the shower cap idea.
Go Team Sheila, go!!