Soup, A Way of Life

Years ago I bought a big, thick cookbook titled “Soup” with a perplexing subheading: “A way of life”. 

I’ve pondered the logic of that title forever. How could a bowlful of tomato, bean or chicken noodle soup determine one’s lifestyle?  Wasn’t this the domain of style or taste?  

But it turns out soup is just that — especially at breakfast. 

When I first witnessed Taipei office workers perched on stools at early morning street stalls slurping down hot steaming bowlfuls of doujiang, while dipping crispy, deep-fried bread sticks into a hot melange of soy bean soup, I knew it wasn’t for me. I could abide by doujiang as a late night snack, especially for its fabled anti-hangover abilities, but nope, not the morning after.

Ditto, say soup naysayers, when it comes to a dinner revolving around soup. A small appetizer, perhaps, but who in their right mind would make soup the star after six? 

Hot summer temperatures also tend to drive many people as far from soup as possible.  Yet not so in the Caribbean where scalding bowlfuls of callaloo or black-eyed pea soup not only assuage hunger but -get this- reduce body heat with cooling streams of sweat.

If anyone is guilty of a soup lifestyle, it’s me. It’s my go-to meal for lunch, dinner and snacks in between.  I make it by the vat full, counting on numerous labeled leftovers to pile into the freezer, otherwise known as my kitchen’s Taste Archives.  

Next time you ponder your lifestyle, consider pouring more soup into it. 
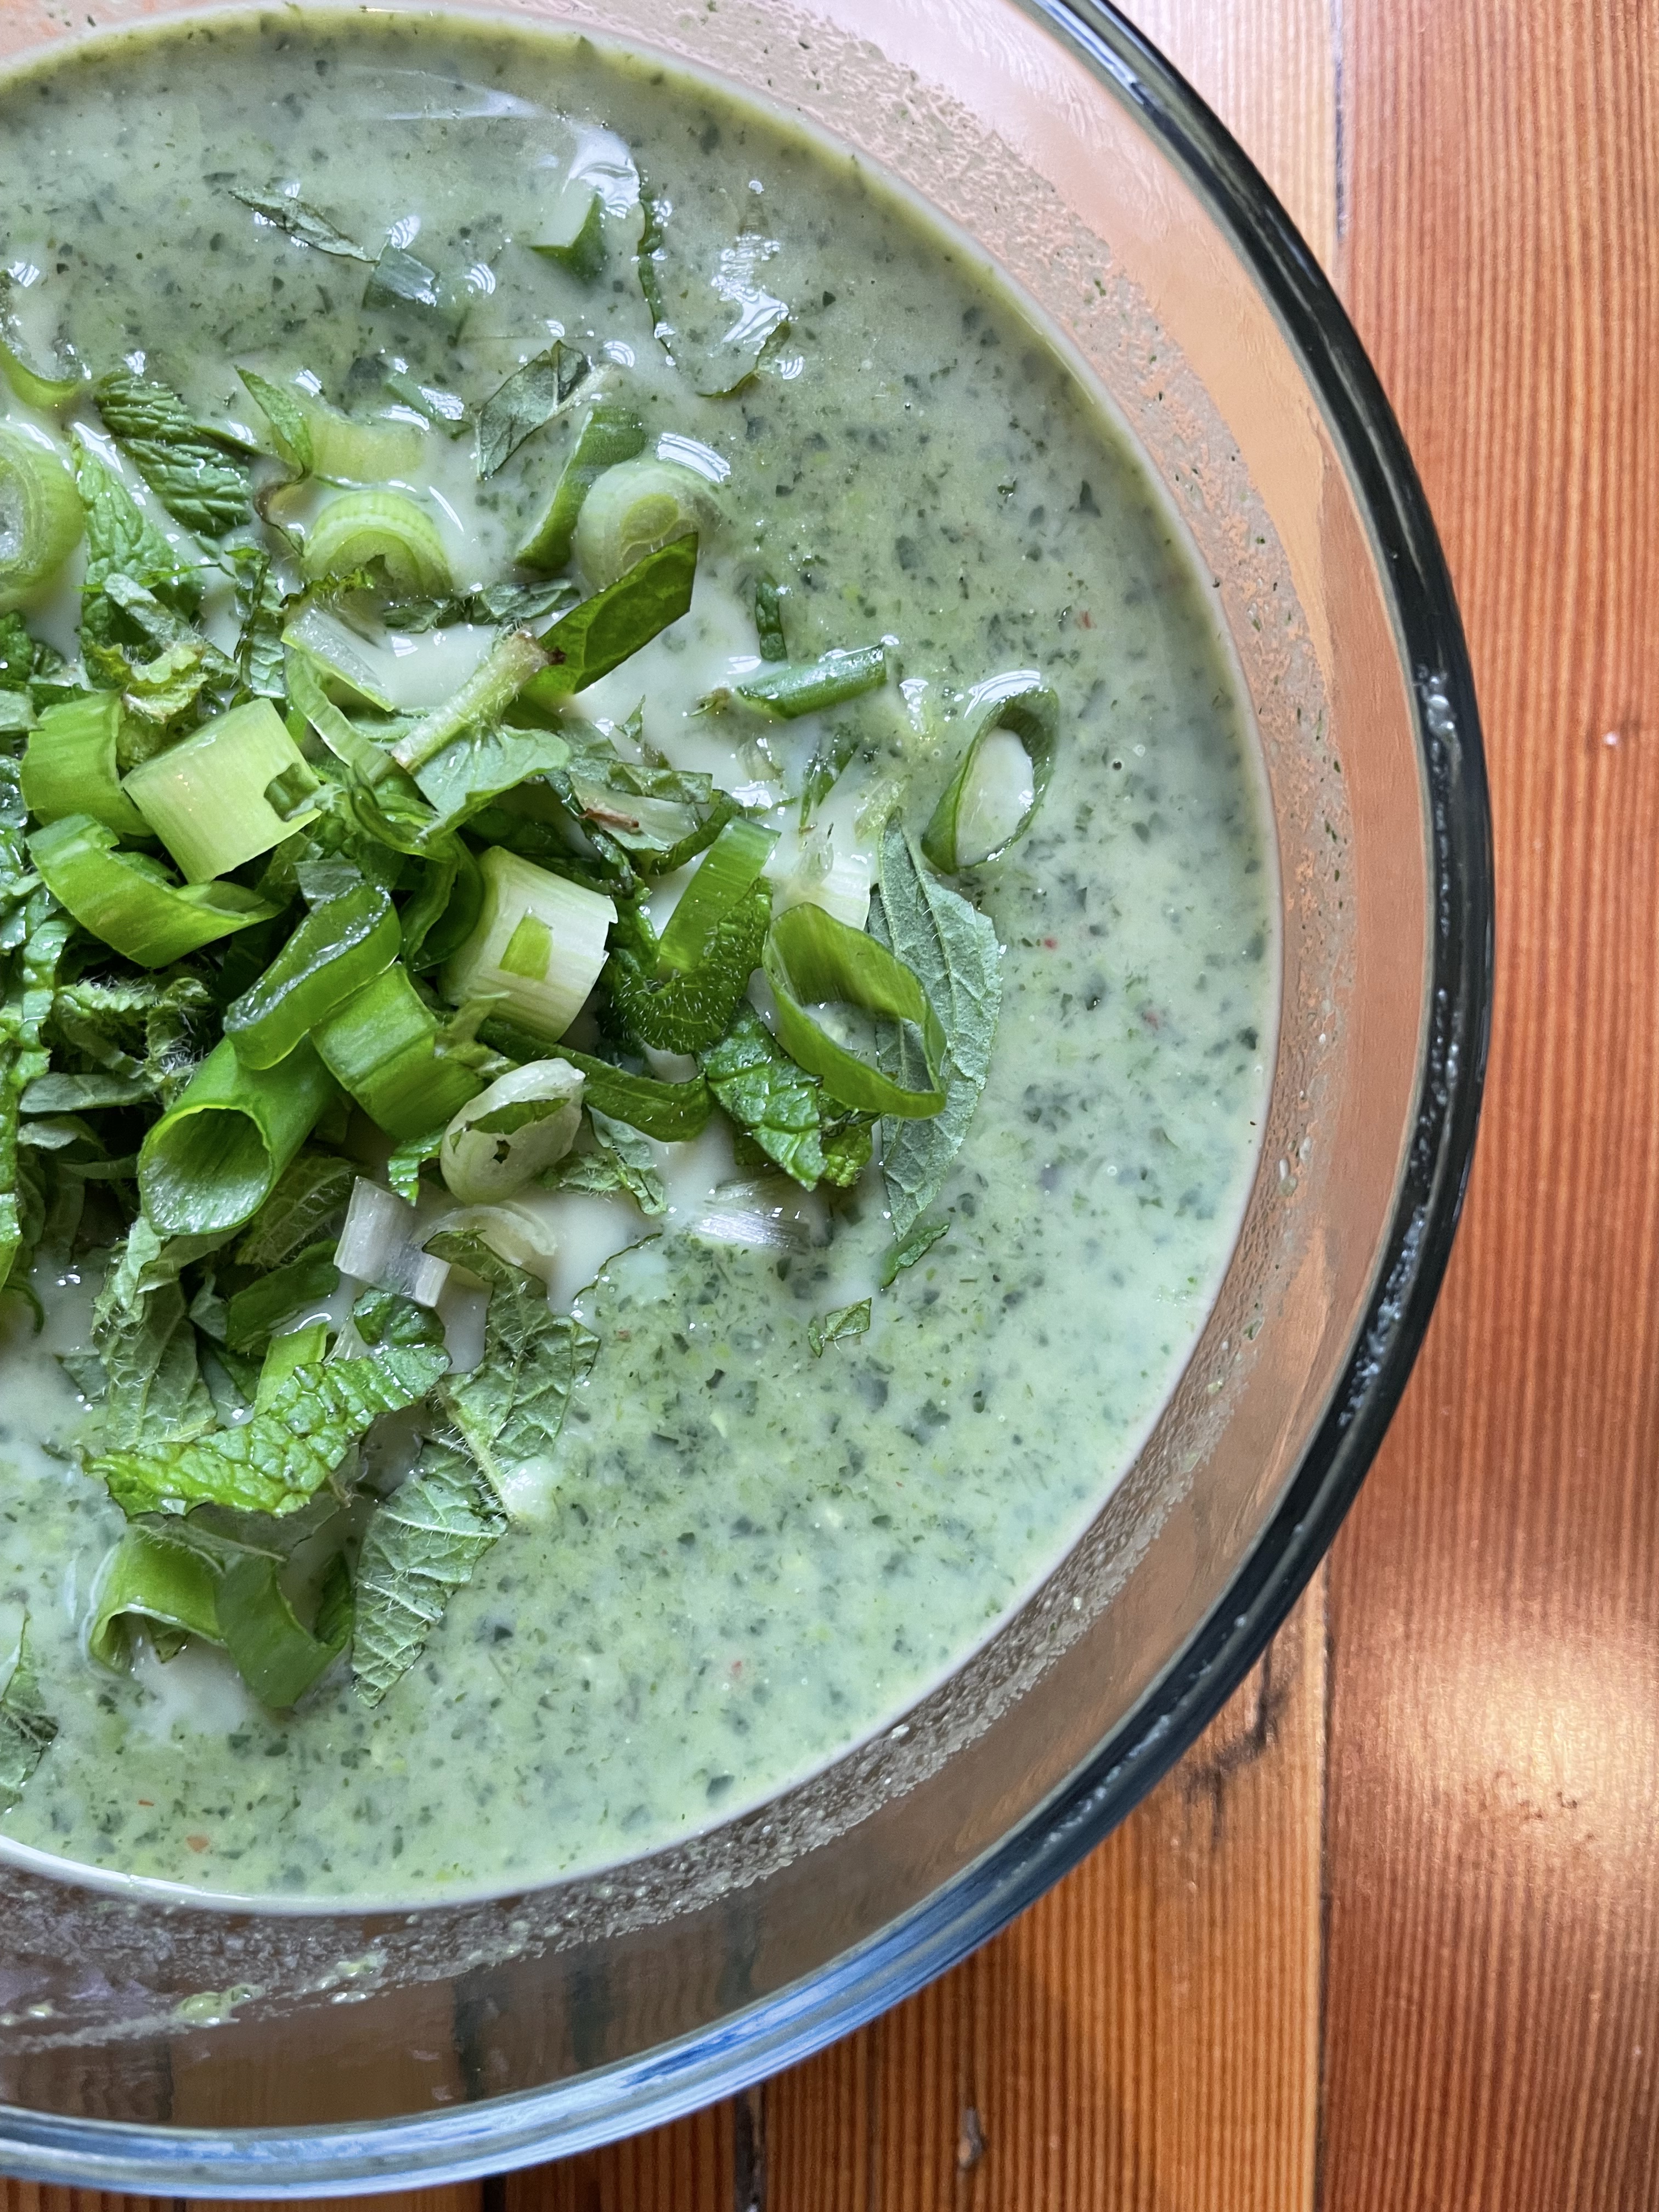
“Potage

This lush green soup  can be served hot or cold, preferably with a dollop of sour cream or cream-top yogurt and a flurry of fresh herbs.  

2 Tbsp olive oil

1 cooking onion, chopped

2 celery stalks, chopped

1 carrot, chopped

2 broccoli heads and stalks, chopped and separated

6 cups chicken or vegetable stock

1 cup frozen green peas

2 cups packed spinach leaves 

1 bay leaf

1 tsp dijon mustard

1/2 tsp cayenne

1/2 tsp freshly ground black pepper

1 tsp salt  

2 tbsp white wine or white balsamic vinegar

1/2-1 cup sour cream 

Green onions 

Fresh mint

Heat a large pot, add oil and sauté onion, celery, carrot and broccoli stalks until tender and fragrant. Add stock and bring to a boil.  Add broccoli florets, peas, spinach leaves, bay leaf, dijon mustard, cayenne, black pepper, salt and white wine or vinegar.   Simmer covered until just tender, about 5-7 minutes. Remove bay leaf. Puree with an immersion blender. Whisk in sour cream or yogurt.  Serve hot immediately or refrigerate and serve chilled. Garnish with fresh mint and green onions.


White Bean & Rosemary Dip

Let’s take the pulse on pulses. I’m talking dried legumes that grow inside pods, be it beans, peas or lentils. 

So much value in every bite.  Full of protein. Packed with fibre. What kitchen can survive without these yummy little packages?

Open my pantry and you’ll find shelf upon shelf of peas – like chickpeas, green peas and black-eyed peas. 

Then there are beans. Kidney-shaped in black, red and white. Black ones, often called turtle and fermented into a salty Chinese condiment. Italian variations like cannellini (white kidney) beans or ceci (chickpeas) beans, borlotti, butterbeans, lupini beans and fava. 

We haven’t even mentioned lentils! Small red ones (also called Egyptian) are one of the quickest you can cook, while green and brown lentils take a few more minutes. But those French babies dubbed Le Puy are my favourite. 

Indian cuisine revels in pulses and you’ll find the largest selection with the most confusing appellations in ethnic food aisles and Indian grocery stores.

Many turn to canned beans instead of dried, for convenience sake. I like to soak and cook pulses in bulk. Once they’re tender, drained and cooled, I freeze and label in two cup containers.  

No matter which pulse moves you the most, your health (and the earth) will thank you if you eat them regularly. 

White Bean and Rosemary Dip

This easy dip needs a food processor to become sublime.  Yes, you can hand-mash canned beans into a delicious affair but I like to use cooked dried beans, which provide more flavour and texture but call out for strong maceration. Do NOT use a blender. Dried beans you hydrate and cook yourself are not only cheaper than canned, but contain zero sodium compared to the oodles found in canned.

1 garlic clove

2 cups cooked white beans such as kidney, navy or cannelinni

Juice of one lemon

1 tbsp chopped fresh rosemary (aprox 5-inch sprig)

1/2 tsp hot smoked paprika

1/4 cup extra virgin olive oil

1/2-1 tsp kosher salt

1-2 tbsp water * optional

Freshly ground black pepper

With the food processor blade running, drop garlic clove down the tube to mince. Add beans, lemon juice, rosemary and paprika and mix until well combined.  Pour oil through feeding tube while the blade is running.  Add water, if needed, to make the puree the right consistency.  Season with salt and black pepper. Serve in a bowl, garnished with a whole sprig of rosemary, a light drizzle of olive oil and a pinch of Vancouver Island flaky salt.

sourdough crackers

Sourdough Crackers

A great place to begin sourdough baking is with crackers or lavash. Every baker who keeps a starter alive has discard. Most of us hate to waste. Instead of tossing your discard away, simply add oil, salt and enough flour to create a soft dough. Most sourdough bread bakers obsess over getting a good rise, but you want crackers to be flat and these will be! Besides, SD discard makes these flatbreads much more flavourful.

Basic Dough

3.5 oz/100 g 100% hydration sourdough discard (SD) 

1 Tbsp olive oil

1 tsp salt

2-4 heaping Tbsp flour

Dough add-ins

1/4 cup Blue Cheese or goat cheese, crumbled

2 Tbsp Sun-dried tomatoes

1/4 cup toasted walnuts, pecans, sunflowers or sesame  seeds

1 Tbsp toasted cumin, coriander, ajwain, fennel or nigella

Chili flakes

Dried rosemary, thyme, sage or oregano

Roasted or finely chopped garlic

Top-ons

Flaky Vancouver Island or Maldon salt

Chili flakes

Once you have fed your starter, get ready to work with the discard or simply cover and leave in the fridge (up to 24 hrs) until you are ready to create cracker dough. Add olive oil, salt and two tablespoons of flour to the discard. Mix.  Add more flour, little by little, until a dough forms and you can knead it in the bowl a few times. 

Add-ins are all optional.  Any add-in ingredients high in moisture, such as soft cheese or roasted garlic may require that more than 4 tablespoons of flour are added to make a dough. 

Flour types will also affect dough formation. In general, cracker dough can take more processed white flour than it can whole or sifted grains, like rye, buckwheat, wheat, barley, cornmeal and spelt.  The more you experiment with different flours and add-ins, the more you will learn about your dough and what you like in a cracker. 

I like to add flaky salt and chill flakes as top-ons (even though the dough may contain both) for instant cracker-bite-appeal. 

Rolling out cracker dough is easy.  Lay out a piece of parchment paper on your counter and dust it and rolling pin with flour.  Roll dough out as thinly as possible. Sprinkle over with top-ons if desired. Prick with a  fork to create a regular pattern. 

Bake on a baking sheet at 325 F for 15-30 minutes.  A very thin cracker will cook faster than a thick one. 

Your cracker is ready to take out of the oven when it is browning around the edges. Remove parchment and using oven gloves, pick it up and see if it bends and is pliable in the middle of a cracker sheet.   If so, it needs more oven time. Sometimes I turn off the oven and leave the cracker sheet inside for an hour or so to really dry out. It’s a good sign if your sheet of dough has cracked in a few places and that may get you thinking about this product’s name.

Finally, how do you cut your crackers? I go with a rustic approach, breaking the baked cracker sheet or lavash into shards, serving in a tall glass. But you may want to use a pizza or ravioli cutter to cut the dough into triangles, rectangles or squares before baking. Ensure even baking by cutting all the shapes into similar shapes. Individually cut crackers will bake in 15-20 minutes.


Tomatillo Salsa Verde

You’ll find fresh tomatillos at Farmers’ Market now, wrapped in their papery husks. Inherently sour, tomatillos make a piquant salsa that can still take a squeeze or two of lime juice. A wonderful item to can. Simply multiply by 6 to create a large batch that will keep your pantry full of salsa all winter long. 


2 tbsp coconut oil 

½ red onion, chopped

1 large garlic clove, chopped

12 tomatillos, quartered

½ tsp salt

¼ cup water

1-2 tsp dried chili flakes

1 tbsp sugar

2 tbsp fresh lime juice

¼ cup chopped fresh cilantro


Heat oil in a medium saucepan and saute onion and garlic until soft and fragrant. Add tomatillos, salt, water and chili flakes and simmer 10 minutes, covered until tomatillos turn light green and sauce thickens. Season with lime juice and garnish with cilantro. Makes 1 cup.

Lavender Plum Jelly

The first time I laid eyes on these plums, the trees were groaning with them. It was  August,  the day we took possession of our Vancouver Island  home in 2016. While David, his brother Norm and sister-in-law Cheryl stood in the courtyard surveying the exterior of the house,  I trotted down the driveway to find out what was green and growing on our 2.5 acres.

Huge rhododendron bushes and plum trees lined the driveway. Shiny red plums, no bigger than marbles, glinted in the sun. None were nearby, but all shone like Christmas ornaments far from reach in the tall,  skinny trees. 

A huge black raven flew over, each flap of its massive wings vibrating overhead. My eyes fell on saffron-painted plums poking out from leafy branches nearby. They were tiny little wonders no bigger than the cherry tomatoes growing in my downtown Toronto containers. Each orangey-yellow orb was splashed with traces of red. Warm to touch in the hot August sun, I picked one and popped it in my mouth, smiling wide.  It had a sweet, pulpy juiciness.

A search ensued! In three minutes, my makeshift t-shirt pouch bulged with a colourful, but slightly moist and sticky bounty.  Juice was trickling out from the overripe, split ones that came in every hungry handful I snatched away from the tree.

With no room for more to carry, I snacked heavily, reducing my load by half as I came closer to another variety-in-waiting. Heavy green clusters of plums weighted down the branches bringing them closer to my reach.  Alas, these golf ball-size beauties were sour and hard:  Not ready for prime-time picking.  I spat out my pit and was surprised to watch it join dozens littered in the grass below, all fallen from the mouths of marauding deer.   

On another branch —  Hope. One once green had ripened to a deep yellow, beckoning. I was perched on rocks that lined the stone walkway down to the dry pond nearby. Teetering on one foot, then the next, I managed to shake the ripe branch and gather the sweet morsels that fell to the ground, avoiding those that fell upon a mound of shiny, black pellets.  Deer scat.

I returned to the house and found the others, tracing their voices echoing through the empty halls. None seemed as eager to sample my found fruit as I, but each nodded their head politely after a taste.

This was just the beginning. What food writer in her right mind isn’t obsessed with gathering sweet, ripe FREE fruit hanging from trees? It’s like finding money dangling from the leaves.   

On superhot summer BC days, when the thermometer slips over 30 and it’s crazy to get out of the shade or up from a lounge chair, I drag my husband out on a blackberry pick.  We wear PPE: Long pants, long sleeve shirts, boots and gloves. We dig out the lawn clippers and apple crates from the garage.  Then we cruise through the windy roads of Maple Bay and environs, searching for manna from the heavens. When we spot black swaths of untouched, unblemished, fat, ripe, abundant berries overhead we no longer cry in vain, thinking they’re unreachable. We simply laugh an arrogant chuckle, deeming ourselves seasoned professionals. David clips the clusters and I catch them in a waiting  apple crate beneath his arms. Once we’ve filled the crates, we aim to stop, but never can.  There’s always another ripe berry around the corner and a few empty plastic bags to hold them.   

Pounds upon pounds of ripe, sweet fruit cannot be consumed instantly. Berries are flash frozen on trays in single layers or tucked into a rustic tart or two. But plums, especially the ones in our orchard, are more troublesome. The pulp to pit ratio is about 50:50. I have cooked them in huge pots on the stovetop or roasted them in the oven, but afterwards, there are  still all those pits to contend with. A food mill can help the process but nothing works finer than my Mehu-Liisa 111 made in Finland.

This three-tiered stovetop pot is basically a small distiller or “steam juicer”. The bottom is filled with water heated to a boil on the stovetop, while the middle portion holds the juice which falls into this catchment area from the large steamer above holding quarts of picked fresh fruit on top.  Take off the stopper and hot clear juice empties out from the fitted plastic hose attachment. Last time I used my Mehu-Liisa 111  I packed it full with 14 pounds of fruit, turned on the heat and collected five liters of juice in under an hour. 

Sadly, plum juice is not a favourite beverage, but it makes beautiful jelly that I can slip into my suitcase and gift friends and family each time I fly back home to Toronto. That way, I can bring a taste of our BC orchard across the country and share the wealth because money found on trees is simply delish.

Herd Road Lavender Plum Jelly

  • Servings: 14 250 ml jars
  • Print

The golden hue of this yellow plum jelly is painted purple with the addition of lavender and whole blackberries. After canning, check all the jars for a tight seal. Makes 14 ½ 250 ml jars of jelly.

12 cups plum juice *
4 tbsp lemon juice
6 tsp Pomona’s Universal calcium water
2 tsp unsalted butter
4 cups refined sugar
9 tsp Pomona’s Universal pectin
½ cup dried lavender or lemon thyme
1 cup frozen blackberries

Sterilize jars.

In a large wide pot heat plum juice, lemon juice, calcium water and butter and bring to a rapid boil.

Combine sugar and pectin in a bowl, then add to juice once it is rapidly boiling. Stir mixture until it comes back to a full boil then take off the heat. Carefully remove foam.

Remove hot sterilized jars and arrange on counter. Put 2-3 frozen blackberries and ½ tsp lavender in each jar before filling with plum mixture leaving ¼ inch headspace and lidding fingertip tight. Process 10 minutes in boiling water.

Remove from canner and listen for a satisfying pop as each lid seals. All the lavender and blackberries will have floated to the top. Wait a few hours for your jelly to gel and cool, then turn a jar upside down to test if the jelly has thickened enough to suspend solids in the middle of the jar. If so, leave upside down for 8 hrs or overnight.

*Substitute with apple or white grape juice

Processing…
Success! You're on the list.

Baking at King Arthur Flour, Part 1: The things I learned in baking school

A scraper is your best friend, especially if you have two

First, we bakers need a white, plastic scraper with King Arthur Flour’s logo embossed on the surface. It’s light and flexible, a strong yet perfectly calibrated plastic that bends in the grip while its curved edge scrapes clean each bowl of messy dough we mix. We find it tucked inside our red recipe folders, compliments of KAF. My bench partner leans over and whispers, “Complimentary now, huh? I think I stole one before. Can’t bake without it.”

Instructor Geoffrey intones, “Dough is always sticky” and demos a clean scrape, lifting a mass of Multigrain with Biga dough in big chunks to the bench (a.k.a. our working surface). Once this dough hits the wooden bench it does exactly as expected. It sticks.

Enter scraper number two. It’s a big piece of stainless steel with a wooden handle and a straight, six-inch edge, sharp and strong enough to cut bulk mounds of dough in clean strokes or measure rolled-out rectangles of dough to the required specs. Better still, it cleans off that ever-present mixture of flour and water that accumulates on our wooden benches incessantly.  Wet dough leaves scat. We bakers obsessively scrape it away (following the wood’s grain if your bench partner suggests). If time permits, we use it to scrape clean our white plastic scraper, too.

IMG_3535
A docker has nothing to do with boats
.

A mysterious tool is on display at the front of the classroom. We are watching Geoffrey demonstrate “Caraway Rye Crisps”. It’s our first baking venture on Day One of the KAF course and Geoffrey doesn’t touch the docker, leaving me curious. I drag this massive white roller flecked with nails across a sheet of freshly rolled-out cracker dough. Instantly, this torture device tears my carefully rolled out dough into shreds.  I opt to make lavash and use a fork to finish the work

Dough has muscle.

According to Jen, our Day Four instructor, dough muscle can vary in strength from loosey-goosey to weightlifter tight.  Day Four happened to be Halloween and Jen is dramatically dressed as a pre-Industrial baker in a floor length dress and apron, her long hair wrapped beneath a layered scarf. Jen points to her clenched fist and dabs the pad below her thumb.

“That’s firm,” she says authoritatively.

“But this,” she says pointing to her flabby underarm muscle that’s impossible to see under the billowing waves of her costume’s fabric, “is absolutely not!”

Geoffrey’s approach to dough muscle did not include his or anybody else’s body parts.

Pushing a bowl full of dough towards us, he says “touch it, feel it.”  After another mix, he beckons again “touch it, feel it.” He chants these four words like a mantra all through the course.

“Touch it, feel it,” after a proof. “Touch it, feel it,” after a pre-shape.  We dip thumbs and forefingers into every mass of gunky dough he offers, pulling messy strands, pinching and prodding, disgusted by the gummy residue that clings like glue to our nails and knuckles.

“Dry, never water-wash your gooey hands,” instructs Geoffrey as he dunks his fingers into a nearby bin of flour, a cloud of flour lifting up. He pulls them out slowly, and methodically rubs off all the gnarly bits into a waste-bin below. He waves his dry, but still visibly floury and crusty hands in our direction and chuckles.

“That’s a bakers’ patina.”

Baker's Patina

Dough texture – and dough muscle – changes all baking day long.  Once fermented or proofed, we poke it again to test strength. Geoffrey calls this “the doorbell ring.” Depending on the bread type, we see that poke spring right back up, leave a deep indent, or something in between.

A baker’s touch is as vital as a tasting spoon, worth every sticky, messy, floury imprint it makes on our minds.

Scale it and tare it.

Baking relies on precision. Flour measured by volume (with measuring spoons or cups) is not recommended. Our individual baking stations are each supplied with a big black scale. Geoffrey says he prefers metric since “the math is easier and grams are more precise.” Bakers are constantly making computations, whether it is tripling a recipe or cutting an industrial mix into one-fortieth of its original size. Those 16 Imperial ounces in a pound just add confusion to the tally.

We start every recipe by measuring out all our ingredients on the scale.KAF Day Four

“The tare button is our best friend,” instructs Geoffrey. “Or it can be the opposite.” As soon as we put an empty mixing bowl on the scale, we tare and the screen returns to zero. We spoon in all-purpose flour and tare. We add rye and tare. We rely on the tare button to refresh the screen and weigh each ingredient separately, but if you inadvertently tare mid-stream, or worse still, your scale times out and goes blank, you can find yourself looking at a huge bowlful of  ingredients containing, God forbid, an unmeasured ingredient that can ruin the whole lot.

Scaling liquids is also tricky. The numbers on a scale just can’t keep up with a fast pour. Better to measure liquids separately and slowly. Scaling gooey blobs of honey or molasses is terminally slow and messy. Handy trick? Use an oiled spoon and honey or molasses slides off effortlessly. Worse still, tiny morsels of instant yeast (living time bombs, in the world of leavening) are so light and airy our scales can’t discern their 1 gram increments. As a result, we bakers sometimes have to ditch science and use our senses instead. It’s that combination of these two forces – one scientific and the other learned by the senses—that creates the mighty and delicious alchemy of baking.

(To be continued, next week)

IMG_3545

Rye Lavash with Maldon Salt, Chili Flakes and Rosemary

Adapted from “Caraway Rye Crisps” this recipe highlights rye’s awesome flavour and is a no-brainer, requiring next to no kneading nor any yeast.  Go ahead and cut these into fussy rectangles for traditional crackers but I prefer baking this out in two large sheets and dubbing it lavash.  Once cooled,  break into long, random sticks and serve alongside dips, paté or cheese.

114g unbleached, all-purpose flour

114g  whole rye flour (we used KAF Pumpernickel)

1 tsp baking powder

¾ tsp salt

25g diced, cold unsalted butter

118g water

20g dark molasses

Maldon salt

Chili Flakes

Dried Rosemary

Preheat oven to 400 F. Line two baking sheets with parchment paper.

In a large bowl, combine all purpose, rye, baking powder and salt. Using a pastry blender, cut in butter until it resembles coarse meal. Scale water in a bowl, tare, and scale in molasses by drizzling from an oiled spoon.  Add liquids to dry and combine with a curved edge plastic scraper kneading into a rough dough. Wrap in plastic, flatten into a disc and refrigerate for at least 15 min.

Place the disc on a lightly floured surface, cut in half and roll out each to 1/16thinch thickness.

Transfer to parchment lined baking sheets. Sprinkle with salt, chili flakes and rosemary and use the rolling pin to press in gently.

Bake 9-12 min or until golden brown.  Transfer to a rack to cool.  Break into pieces, if desired.

KAF Day One